I don’t play video games often, but this weekend I got the flu, so I took it upon myself to setup my newly-built desktop for some gaming while I’m under the weather.
Gaming on Linux has come a long ways in recent years. Developments such as Proton have made gaming on linux easy and pain-free for the majority of games. And with the recent release of the ever-popular Steam Deck and the growing popularity of Linux amongst gamers, it’s easy to see that game compatibility is going to continue to get better for the Linux platform as the target market grows.
This guide will show you how to get started gaming on a fresh-install of Linux:
- Installing Steam
- Enabling Proton
- Installing and Using Lutris
- Installing MangoHud for Real-Time Performance Metrics
I’m running PopOS on my desktop, so this guide should apply to any Ubuntu-derived distribution.
Installing Steam
Installing Steam is pretty straight-forward, as it probably already exists in your distribution’s standard repositories. Simply run:
sudo apt install steam
Note: I prefer the .deb version of Steam, for no other reason than ignorance to flatpaks. If you try to install Steam through your distribution’s GUI package manager, it may try to install the flatpak version. This guide assumes the deb version is installed.
Enabling Proton
When you first launch Steam, make sure you enable the Proton compatibility layer in the settings. This isn’t enabled by default.
Go to Settings → Steam Play →
- Check Enable Steam Play for supported titled
- Check Enable Steam Play for all other titles
- Select Proton Experimental
Steam will now download the Proton compatibility layer. After restarting Steam, you’ll be able to run games that are not natively supported on Linux.
Determining if a Game is Compatible
If a game is natively supported on Linux, you should have no issues playing it, so long as your hardware is powerful enough to run it.
But if your game requires Proton to run, you can use ProtonDB to search a specific game and see if other people in the community have had luck running the game you desire to play. Sometimes games won’t launch unless you have specific launch options specified in Steam, and you can find these on ProtonDB easily.
Installing Glorious Eggroll’s Custom Proton
There’s a popular fork of Steam’s Proton known as proton-ge-custom. Some games run much better on this fork, and so I think it’s wise to install this so that you can always try it as an option if regular Proton doesn’t work for a specific game.
To install:
- Download a release from the Releases page
- Run:
mkdir -p ~/.steam/root/compatibilitytools.d - Extract the release tarball into the folder you just created with:
tar -xf GE-ProtonVERSION.tar.gz -C ~/.steam/root/compatibilitytools.d - Restart Steam.
- You can now select GE-Proton from any game’s compatibility settings.
Installing and Using Lutris
Now that you have Steam installed, you can probably play the vast majority of games you’d ever want to play, but what if you want to play something exclusive to Battle.net? Then your best bet is to install Lutris.
Lutris is a program that acts as the one-and-only game launcher/manager on your system. It can combine your game libraries from Steam, Battle.net, Origin, etc. On top of that, Lutris makes it super easy to install and run Windows games through community installers. Other people have already put-in the hard work to get these games running on Linux, and all you have to do is start an install script through Lutris.
For this example, I’m going to instal Battle.net because one of my favorite games is Diablo II, which isn’t available on Steam.
- Open Lutris and click the Add Game or +-icon button.
- Select Search the Lutris website for installers.
- Search Battle.net
- Select Blizzard Battle.net
- Click Install
- Let the install script run and, when prompted, sign-in to your Battle.net account.
Once you have Battle.net installed in Lutris, you can simply install and launch Diablo II (or any other game that’s compatible) from within Battle.net.
Using Different Wine Runners
A wine runner is a custom version of wine used to run your game. Some games work better with different versions of the wine runner. Lutris makes it very easy for you to install and manage multiple wine runner versions because some games run better on one version over another.
- On the Lutris main menu, under Runners, select the download-icon next to Wine
- In this menu, install any of the numerous runners available to you. I select the following
- lutris-ge-lol (Proton-glorious-eggroll for League of Legends)
- lutris-ge (Proton-glorious-eggroll)
When you want to use any of these custom wine versions, simply:
- Right-click your game and select configure
- Click Runner options
- Select the runner in the Wine version drop-down menu
Installing MangoHud for Real-Time Performance Metrics
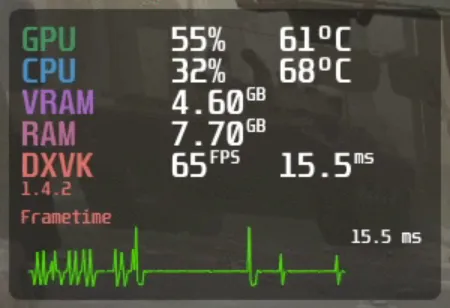
When you start gaming on Linux, you’re probably going to be curious how the performance compares to gaming on Windows, or you might want to compare the performance of game settings or wine runners. I use MangoHud to do this. MangoHud is a tool that many people in the community use to display helpful system information. It’s highly customizable, so you can choose exactly what information you want to see.
To install MangoHud:
cd ~/.local/bin
git clone --recurse-submodules https://github.com/flightlessmango/MangoHud.git
cd MangoHud
./build.sh build
./build.sh install
Note: I choose to clone and build MangoHud from source instead of using the package manager because the version of MangoHud in the standard repositories doesn’t support 32-bit games like Team Fortress 2
Running MangoHud
To enable MangoHud, run:
mangohud /path/to/appFor Lutris games, you can configure this on a pre-game basis.
For Steam games, you can add this as a launch option:
mangohud %command%For OpenGL games, you need to enable dlsym hooking:
mangohud --dlsym %command%MangoHud Configuration
You can customize MangoHud by providing a config file. I always copy the example config file and comment/uncomment the options that I want.
cp /usr/share/doc/mangohud/MangoHud.conf.example ~/.config/MangoHud/MangoHud.confMy config looks like this:
gpu_stats
cpu_stats
vram
ram
fps
frametime
And there you go! You should now have a competent setup to play and test games on Linux!